Tuesday, October 29, 2013

Our Annual Tea

Here are the pictures from our annual tea (yes, this is from April).  Each year I host a tea for all the girls & ladies in my family.  My mom, sisters, SIL's, Aunt, and nieces.  It's a great time for me to do something girly!

This year's tea was an Edwardian theme.  I love the elegance of the colors and the china.  I used the china I received from my wedding and the silver and stemware my mom had.  


Each year I give a charm to each lady and I wrapped this one in a glassine bag that I shaped into a tea bag.


Of course we have to eat!  Here is our menu... 


Here are the previous two teas I have hosted.
2011
2012
Posted by Picasa

Saturday, August 24, 2013

A sweet apple treat


As a new school year begins, I'd like to share a super cute treat with you.  Great for a little teacher "thank you," or a fun neighbor gift for the fall.  I gave these to the boys' teachers in May for teacher appreciation week.  They. Are. Yummy.  Let's just say one of their teachers ate hers with a SPOON!

I found the little containers at Hobby Lobby.  The inside yumminess consists of Nutella, Marshmallow Creme, caramel dip, and crushed Heath bar for some texture.  Pretty much anything you can think of to dip an apple in.
I layered them until they were filled up.
I used Granny Smith apples to add some sour to the sweet.


Of course, cellophane makes everything just a little cuter and some ribbon and raffia was added for a bow.


Here are my three boys on the first day of school this year!  Getting big!


Posted by Picasa

Tuesday, July 30, 2013

My favorite cookies


A few years ago I had the best chocolate chip cookies from a friend but the recipe was a secret so I had to go on a search for my own awesome chocolate chip cookie recipe.  I finally found it.  Thank you Jenny!!!  
It is the New York Times Chocolate Chip Cookie Recipe.
The secret is the sea salt sprinkled on top.  So yummy.
I have a thing for sweet and salty...

I make them huge.  I like the affect of "oh my goodness those are HUGE cookies!!"  Plus, one is good enough for a Christmas present.  LOL.  Here's the recipe.  

(I have to admit the first time I made them I followed the recipe exactly.  Waited the whole day for them to stay in the fridge. 
Ugh...yeah...didn't do that the next time.  Couldn't wait.
They were FINE!)


new york times chocolate chip cookies

Yield: 18 very large cookies or 31 smaller cookies
Prep Time: 15 min + chill time
Cook Time: 18 min

ingredients:

2 cups minus 2 tablespoons (8 1/2 ounces) cake flour
1 2/3 cups (8 1/2 ounces) bread flour
1 1/4 teaspoons baking soda
1 1/2 teaspoons baking powder
1 1/2 teaspoons coarse salt (I used sea salt)
1 1/4 cups unsalted butter (2 1/2 sticks)
1 1/4 cups (10 ounces) packed light brown sugar
1 cup plus 2 tablespoons (8 ounces) granulated white sugar
2 large eggs
2 teaspoons vanilla extract
20 ounces bittersweet chocolate chips (I used semi-sweet)
extra chocolate chips, optional
sea salt (optional)

directions:

1. Sift together the dry ingredients (flour through salt). I just scraped mine through a fine strainer/sieve since my sifter isn't all that great. Set aside.
2. Use an electric mixer to combine the butter and sugars- mixing until the mixture is very light, about 5 minutes. Mix in the eggs, one at a time. Add the vanilla. Reduce the speed to low, add the dry ingredients and, mix just until the dry ingredients are incorporated. Stir in the chocolate chips. Place the dough in an airtight container and refrigerate a minimum of 24 to 36 hours before baking (and up to 72 hours).
3. Preheat oven to 350 degrees F. Line baking sheets with parchment paper or silpat mats.
4. For 5-inch cookies, scoop six 3.25 ounce mounds of dough- giant golf ball-sized (I rolled mine into balls) onto a baking sheet, spacing them evenly apart. Don't try to fit more on the sheet or you'll end up with cookies baking into each other. Dot some extra chocolate chips on top, if desired. Sprinkle each ball of dough with a small pinch of sea salt, if desired.
5. Bake until the edges are golden brown and the center is lighter and soft, 18 to 20 minutes. Let the cookies cool on the baking sheet for about 15 minutes, then transfer the cookies to a rack and let them cool completely. Repeat with the remaining cookie dough.

tips:

*If you'd prefer to make smaller cookies, shape your cookie dough into small golf ball-size instead (2 ounces), and bake for 15 to 18 minutes.


Posted by Picasa

Wednesday, April 17, 2013

Totino's Pizzeria

Hi blog friends,
Recently, I was able to try Totino's new Pizzeria Rolls from General Mills.  They provided me with a gift pack, info, and three coupons to try the rolls free. Our favorite?  The Meatball Marinara Rolls.


Please visit Totino's Website or check out their Facebook page.
You can find a coupon on their Facebook page while supplies last!
On their website they also have 8 new dip recipes that would be fun to make.  Perfect for dipping!


Here's your chance to win a Totino's Pizzeria Rolls gift pack!  Comment below which one YOU think you'd like to try and I'll draw a winner to receive 3 coupons for FREE bags  of rolls plus the Bistro tray and salt and pepper shakers courtesy of General Mills.


Random drawing from comments below will be held on Saturday, April 20th.  Please include your email address in the comment so I can get your address.
Thanks! 


Monday, March 25, 2013

Two Candy Buffets

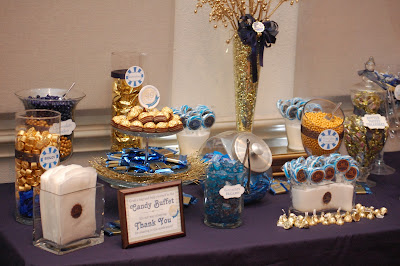
Don't you just love Candy Buffets?  So fun.  So happy.  Recently, I've had the privilege of doing two.  The first one was for my brother and SIL at their wedding.  Peacock feathers, purples, blues, and greens were their theme.  Beautiful.  Elegant.
The candy for this was SO FUN to buy for!  There are tons of different candies in these colors and everything was so vibrant.  Green gummy limes, blue raspberry gummy bears, licorice, M&Ms, kisses, turquoise chocolate covered sunflower seeds and Ashley's favorite, Sour Punch Straws, just to name a few.


I also have to brag on my SIL Ashley a little.  She did an amazing job picking out the decor for her wedding.  I know Pinterest was her best friend for many months.  Love the centerpieces.  Probably the biggest thing I was surprised about at the reception was the lighting.  They had a guy come in and set up LED lights with a purple hue and boy, did it make a difference in the feel of the party!  Great idea!


...................................................................................


The next one was for the boys' school 40th Anniversary Auction & Gala.  This one was a little bit more difficult.  The theme was Blue & Gold and of course 40 years of ministry to children.  I learned there are TONS of different colors of navy blue.  The gold was pretty easy.  A good amount of individually wrapped candy is golden.  Snickers, Ferrero Rocher, Kisses, Rolos, etc.  I also used colored candy in the "yellow" deparment and it coordinated well with the gold.  Chocolate Sixlets, Gummy Bears, Ghirardelli Chocolate, and Caramel Saltwater Taffy were some of the other choices I used.


Several people have asked me over these months where I buy the candy from.  Alot is bought online.  You have to be very careful because from website to website the prices per pound can vary.  I've used Candy Warehouse, Bulk Candy Store, and Oriental Trading in the past.  I also buy the more common candy from local grocery stores.  Kisses, individually wrapped chocolates, etc.  You can find them on sale at different locations.  

I like candy buffets because they can be customized so many ways.  Budget, size, colors, themes, etc.  Have fun!

Kerrie 


Posted by Picasa

Thursday, March 7, 2013

Katie's Sprinkle


 What a fun baby shower!  We wanted to do a small sprinkle for Katie for her second baby girl, Cora.
Of course we had to use pinks, reds, and hearts for such a name.
My sisters are the bakers in the family.  I did not inherit such greatness.  Take a look at the cupcakes and sugar cookies.  Amazing.  Katherine melted pink chocolate in the form of tiny hearts on wax paper to make toppers for her cupcakes.
Kelly makes REALLY good sugar cookies and made small pink hearts. 


 I concentrated on the decor.  I made paper hearts out of scrapbook paper and got the idea and know-how from this website.
We hung them on the windows and on the light fixture above the table.  For the party favors I melted white chocolate (almond bark) and sprinkled toffee pieces in silicon heart molds.  Wrapped them in bags and that's it!  Simple.


Cousins


Mom and Daughter
 
All the girls! 
Posted by Picasa

Monday, February 25, 2013

Painted Tables

First, let me apologize for the not-so-perfect pictures.  My Nikon lens broke so I had to use my iPhone.  

The first table is a coffee table we found at my parent's farm.  It was a hot mess...  Beaten up, chipping paint, and really wobbly.  Michael helped me with the structure and then I sanded it, painted it, distressed it, and sealed it.  Her legs are gorgeous.  She made her home this week in the silent auction at the boys' school.  Let's hope we raise a little money for it!


The second table is a great little farmhouse table that my parents had in my childhood home.  Ours was too big with the buffet table and this was a better fit.  Painted it solid white to have more of a formal look in our dining room.  It is only distressed a bit, which is hard for me to do sometimes!  :)


Ahhh, what a little paint can do...

Enjoy your week!
Kerrie 

For local painting inquiries, please contact me at
thesalvagedsparrow@gmail{dot}com 


Tuesday, January 1, 2013

Tailgating Fun

This year for homecoming, my friend and I wanted to do something special for our kids in 6th grade.  The Friday of the homecoming game, we had a tailgate lunch for them. 
It was so much fun!  
Yes, I know, it screams Pinterest.  What else can a girl do these days?  We even talk about things being "Pinteresty."
I think it's the details that make even simple things special.


For example, these water bottles.


I peeled off the Kroger label and designed and printed out some Bronco and homecoming labels and laminated them at Mardel.  (25 cents a foot DIY)  A little hot glue to secure them and you've got personalized water bottles.

 
These "penalty pops" are yellow napkins with tootsie pops in them upside down.
  
 
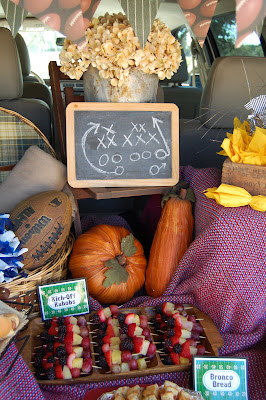
 Of course we had to set up everything in the back of our vehicles to get that authentic tailgating feel! 
 
The football pennants were cut out using a template and scrapbook paper. Hot glue to adhere to twine.


I made a canvas pennant with the word Broncos on it to attach between the cars.


If I'm having a theme party I try to be as goofy as possible and name the food items to fit with the theme...
Kick-Off Kabobs
Hail Mary Hot Dogs
Bronco Bread
Touchdown Twix
Half-Time Hamburgers
(p.s. the Bronco Bread is the Crack Bread recipe I posted a while back)


Most of the items I used were from my house.  This is a great way to keep the cost down.  A little wooden chair, a chalkboard with a faux football play on it, some pumpkins, pom poms, blankets,  and boxes for height.


Posted by Picasa